This manual describes version 0.2.0 of Authodox.
Table of Contents
Authodox is an experimental application for modelling and reasoning about authority in systems of interacting agents, here called objects. One of its primary uses is to detect insecurity in the form of excess authority. Authodox uses the CSP process algebra and its automatic model checker, FDR, to accomplish this.
Authodox differs from previous tools for reasoning about authority, such as SCOLLAR, because it is able to reason about causation (the effects an object can cause) as well as acquirable permission (those objects an object can interact with directly).
Authodox is able to distinguish different kinds of causation, including positive causation (in which the occurrence of events cause others to occur) and negative causation (in which the occurrence of events cause others to not occur). Authodox therefore allows an object's authority to be characterised in terms of the events an object can perform directly (acquirable permissions), the events an object can cause to occur (positive causation) and the events an object can prevent from occurring (negative causation). In this way, it offers very high levels of precision when reasoning about authority.
The natural expressiveness of CSP allows Authodox to be used to model various kinds of systems in which authority is important, including various kinds of access control paradigms such as capability-based and identity-based access control. It has been used to accurately measure authority beyond the reach of previous approaches, such as:
- being used to detect confused deputy vulnerabilities without requiring prior knowledge of their possible existence (see the section called “A Tutorial Introduction to Authodox”),
- as well as being used to compare the functioning of object-capability patterns, including those that deal with revocation, in various kinds of object-capability system that exhibit various levels of concurrency (see the section called “Some Example Systems in Authodox”).
The theory on which Authodox is based is partially described in the paper Authority Analysis for Least Privilege Environments by Toby Murray and Gavin Lowe, in Proceedings of the Joint Workshop on the Foundations of Computer Security and Automated Reasoning for Security Protocol Analysis (FCS-ARSPA'07), 2007. Authodox was used to generate the results that appear in the paper Analysing Object-Capability Security by Toby Murray, in Proceedings of the Joint Workshop on the Foundations of Computer Security, Automated Reasoning for Security Protocol Analysis and Issues in the Theory of Security (FCS-ARSPA-WITS'08), 2008.
Warning
Authodox is currently in the prototype phase of development. It is known to contain some none-too-subtle bugs (see the section called “Known Bugs and Limitations”) and likely contains many others that are unknown. Also, while Authodox is designed to rigorously model and analyse the security properties of systems, it's quite possible that implementation errors in the software exist that may result in the production of misleading or incorrect results. Caveat emptor.
In order to run Authodox, you'll need the following installed.
- FDR (known to work with versions 2.82 - 2.83),
- Python 2.4 or later,
- GTK 2.6 or later,
- PyGTK 2.6 or later.
The following are also recommended as functionality is reduced in their absence:
- GraphViz (known to work with version 2.6),
At the time of writing, the most recent version of FDR (2.83) is now available to download at no charge for academic teaching and research purposes. It is being offered in binary-only form and is available at http://www.fsel.com/fdr2_download.html.
Binaries are available for Solaris (SPARC), Linux (x86) and
OSX (x86 / PowerPC Universal Binary). To install FDR, download the
appropriate binary. Unpack it to a suitable directory and set the
FDRHOME environment variable to point to the
location in which FDR was unpacked.
For example, the following commands successfully install FDR for use by Authodox on the author's Linux system.
        # download the Linux binary
        wget http://www.fsel.com/download/fdr-2.83-linux-academic.tar.gz
        # extract the binary; creates the directory fdr-2.83-linux-academic
	tar -xzf fdr-2.83-linux-academic.tar.gz
	# set the FDRHOME environment variable appropriately
	export FDRHOME=$PWD/fdr-2.83-linux-academic
To install Authodox, complete the following.
- Unpack the archive to a local directory in which Authodox is to be installed.
- Set the
AUTHODOXHOMEenvironment variable to point to this directory. - If it is not set already, set the
FDRHOMEenvironment variable to point to the directory in which FDR has been installed.
To run Authodox, execute the following command. ${AUTHODOXHOME}/dox
When Authodox is started, you will be greeted by the following window.

This window shows Authodox with a single, empty system open, called "Unsaved System 1". When started with no command line arguments, Authodox automatically creates a new empty system for you to edit.
Previously saved systems can be opened as follows.
To open a system, choose -> to display the Open File dialog. Select the file that contains the system that you want to open, then click . The system is displayed in the Authodox window.
You can have multiple systems open in Authodox. One system is displayed at a time in the application window. Authodox adds a tab for each open system to the window. To display another open system, click on the tab that corresponds to it. You can also use the menu to move between the open systems or right-click on any of the tabs to bring up a pop-up menu that can be used to move between the open systems.
When starting Authodox from the command line, you can instruct it to
automatically open previously saved systems by supplying the names
of the files to which the systems were saved on the command line.
For example, starting Authodox with the following command instructs
it to open the systems contained in the files
system1.dox and
system2.dox.
${AUTHODOXHOME}/dox system1.dox system2.dox
This tutorial introduces the major features of Authodox version 0.2.0 by walking through the process of modelling and reasoning about authority in a small, but illustrative, scenario.
The scenario that we are going to model is known as The Confused Deputy and was first formally described by Norman Hardy in the paper of the same name, which appeared in Operating Systems Review, volume 22, issue 4 (October 1988).
The model of this scenario is based on that presented in the paper Authority Analysis for Least Privilege Environments by Toby Murray and Gavin Lowe, in Proceedings of the Joint Workshop on the Foundations of Computer Security and Automated Reasoning for Security Protocol Analysis (FCS-ARSPA'07), 2007.
The scenario comprises three actors, which Authodox refers to as objects, called Alice, Bill and Carol. Carol is a compiler that has permission to write to a special purpose billing file, Bill, in which she records a log of her usage by her clients. Alice is a client of Carol and has permission to execute Carol. When executing Carol, Alice supplies the name of a file to which Carol should write the compilation output. By supplying the name of Bill when invoking Carol, Alice can cause Bill to be overwritten with the compilation output.
By assumption, Alice is not trusted to be able to overwrite Bill; otherwise she would have been provided with permission to do so herself. Because Alice can cause Bill to be overwritten, we say that she has excess authority, because she can cause something to occur which we don't trust her to be able to do.
We will model this scenario in Authodox and show how it can be used to detect Alice's excess authority.
Note
The model of the scenario created below can be found in the
example system (see the section called “Some Example Systems in Authodox”)
located at ${AUTHODOXHOME}/examples/ConfusedDeputy/sys1.xml.
After installing and setting up Authodox (see the section called “Getting Started”), start the application with the command ${AUTHODOXHOME}/dox. This starts Authodox and creates a new, empty system to be created for you to edit.
Begin by saving a copy of the empty system to disk. This will enable
us to save future changes easily. Select
->
to display the Save As dialog. Choose a new file
in which to save the new system, such as
/tmp/ConfusedDeputy.xml then click
.
Now, further changes to the system can be saved to file simply
by clicking the toolbar button, or by
pressing Ctrl-S.
The first thing to do is to set the global properties of our system. In this case we need to tell Authodox that the various operations that we model in our system are parameterised. The operations that we will model include reading and writing to and from a file (such as when Carol writes to Bill), and executing a program (such as when Alice executes Carol). When executing Carol, Alice is able to specify the name of a file that is to receive the compilation output. This file name must be specified as a parameter to the operation that Alice performs on Carol to execute her. Hence, we need to tell Authodox that our operations are parameterised.
Note
Authodox doesn't support having some operations parameterised
and others not. In order to model operations that are naturally
unparameterised in systems that have some parameterised operations,
Authodox includes a null parameter
value that can be used in this case. The Read,
Write and Append operations that we will
define shortly are unparameterised and provide a good example of
how to model unparameterised operations in a system that includes
some operations that are parameterised.
Click on the System row of the system tree view, displayed on the left-hand side of the main window. This should be the topmost row of the tree and is used for setting global system properties. The right-hand pane should change to display a window labelled System that contains a checkbox labelled Operations are Parameterised. Check this checkbox. You'll notice that the tree view has changed so that the Status of the System component is now (modified). This means that part of this component (which represents the global system properties) has been changed but that the changes are yet to be applied.

Click the Commit button to apply the change. Then save the modified system to disk by clicking the Save toolbar button.
Having set the global system properties, we must now tell Authodox what sorts of operations are modelled in our system. To model the Confused Deputy scenario, we will use the following operations:
Read-- to model reading from a file,Write-- to model writing to a file,Append-- to model appending to a file andExec-- to model executing a program.
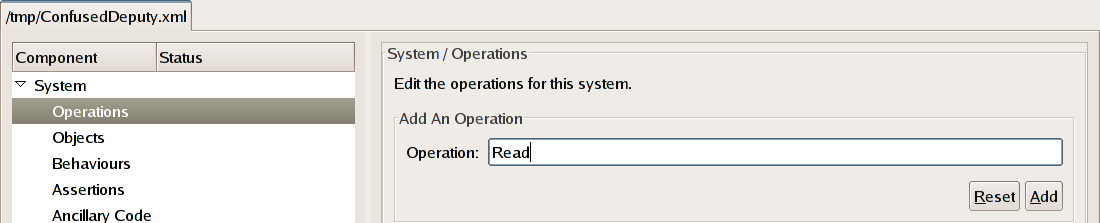
To create the operations, click on the Operations
row of the system tree view. Type the name of the first operation,
Read, into the text box underneath the words
"Add An Operation" and click the
Add button.
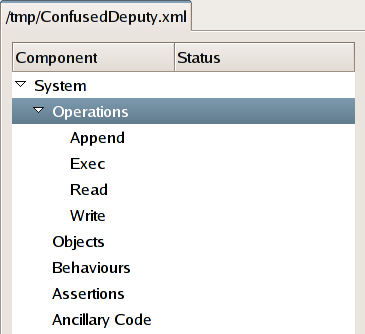
Note
After adding the first operation, the Operations tree row can now be expanded. You can click on the small arrow to the left of the word "Operations" in the tree view to expand the row. Each of the system's operations should be listed underneath. An operation can be removed by clicking on it, and then pressing the Delete button that appears in the right-hand pane next to the tree view.
Repeat the process to add each of the other operations to the system. You should now be able to expand the Operations row so that underneath it is listed each of the four operations.
We must now define each of the different kinds of behaviour that entities within our system can exhibit. In our example, there are only three:
File-- represents the behaviour of a file, like Bill.Compiler-- represents the behaviour of a compiler, like Carol,User-- represents the behaviour of a possibly hostile user, like Alice, and
In Authodox each behaviour is specified as a (usually parameterised)
CSP process (see
the section called “Authodox CSP Reference”).
The send channel is used to send invocations
to other objects in the system, while incoming invocations are received
on the recv channel.
An event
send.target.op.arg
represents the invocation of the object
target
to perform the operation
op,
passing the argument arg.
arg is either an object
name or is the value null. In systems that have no
parameterised operations, the
arg part is omitted.
An event
recv.from.op.arg
represents the reception of an invocation from the object
from
to perform the operation
op,
with the argument arg.
Again,
arg is either an object
name or is the value null. In systems that have no
parameterised operations, the
arg part is omitted.
The invocation by object
source of object
target to perform the
operation op with argument
arg can proceed only when
both
source is willing to
perform send.target.op.arg and
target is willing to
perform recv.source.op.arg. At this point the
invocation may proceed.
Let us take each of the behaviours in turn and show how they may be defined.
We define the behaviour
File(acl) to represent the
behaviour of a file. Notice that File takes a parameter,
acl, which represents the
file's access control list.
acl is the set of
objects that are allowed to access the
file in question.
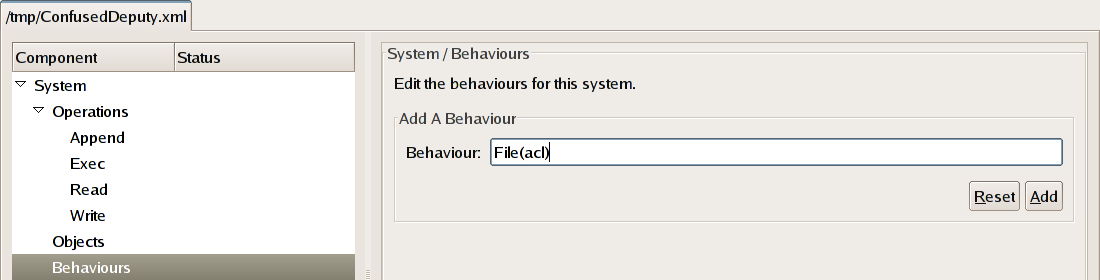
To add this behaviour to the system, click on the
Behaviours
row of the system tree view. Type the name File(acl),
into the text box underneath the words
"Add A Behaviour" and click the
Add button.
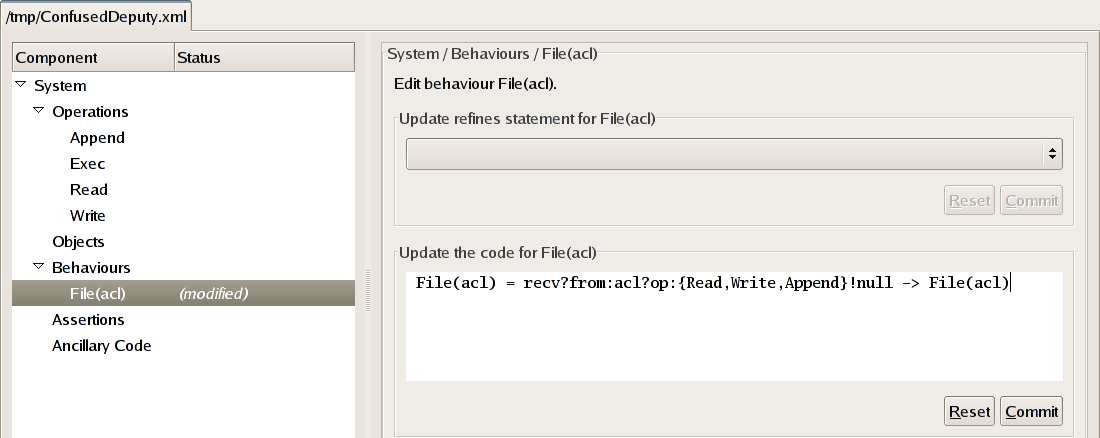
We now need to define the actual workings of the File behaviour. To do this, expand the Behaviours row of the tree and then click on the File(acl) child row, which will alter the display so as to allow us to define the workings of the behaviour.
The job of a file is to accept requests to Read
from it and to Write and Append to it by those
objects that are allowed to do so (i.e. those that are members of the
set acl). Hence, we may define its behaviour simply
as follows.
File(acl) = recv?from:acl?op:{Read,Write,Append}!null -> File(acl)
File(acl) is willing to engage in any event
recv.from.op.null
where from is a member
of the set acl and
op is a member of the
set {Read,Write,Append}. Its environment may choose
which event is performed, after which point it returns to its
initial state. Observe that we use the null parameter
value for these operations, since we are not interested in modelling
the actual data that is read from or written to a file but merely
the fact that such an event has occurred.
Type (or paste) the definition above into the text box underneath the words "Update the code for File(acl)" and then click the Commit button.
Note
If you're wondering what the "Update refines statement for File(acl)" box is for, fear not; we come to it later on.
We define the behaviour
Compiler(acl,logFile) to represent the
behaviour of a compiler who may be invoked by any object in the set
acl and whose billing file
in which it records a log of its usage is the object
logFile.
Repeat the process above to add this behaviour to the system. After doing so, a new row labelled Compiler(acl,logFile) should appear in the tree as a new behaviour.
The job of a compiler is to receive Exec invocations
from any object in its access control list. These invocations must
specify a file in which the compiler is to write the output of the
compilation
process. Once invoked, the compiler should Write to the
given file, before it Appends to its billing file,
logFile. At this point,
it may return to its initial state.
From this description, we may define a compiler's behaviour as follows.
Compiler(acl,logFile) = recv?from:acl!Exec?arg:Object ->
                        send.arg.Write.null ->
                        send.logFile.Append.null -> Compiler(acl,logFile)
Click on the Compiler(acl,logFile) row of the system tree and type (or paste) the definition above into the text box below the words "Update the code for Compiler(acl,logFile)" and then click the Commit button.
We define the behaviour User to represent the behaviour of an arbitrary user. The User behaviour is designed to model a totally untrusted user about whom we make no assumptions. Hence, it should exhibit any and all behaviours that are possible for a user within the scenario.
Repeat the process above to add this behaviour to the system. A new row labelled User should appear in the tree as a new behaviour.
We wish to model the behaviour of a user that will try to Exec any program that they can, and Read from, or Write or Append to any file that they can. To capture all possible behaviours, we want the most nondeterministic process that exhibits these behaviours.
From this description, we may define a user's behaviour as follows.
User = (send?other?op:{Read,Write,Append}!null -> User []
        send?other!Exec?arg:Object -> User)
       |~| STOP
Click on the User row of the system tree and type the definition above into the text box below the words "Update the code for User" and then click the Commit button.
Having defined each of the different behaviours in our system, we must now define each of the objects. Each object instantiates one of the behaviours defined above. Our scenario comprises the following objects.
Alice-- a UserBill-- a File whoseaclis the set{Carol}andCarol-- a Compiler whoseaclis the set{Alice}and whoselogFileisBill.
To instantiate each of the objects, begin by clicking on the
Objects row of the tree. Type the name of the
first object, Alice, into the text box labelled
Name underneath the words
"Add An Object". Then select the corresponding
behaviour, User, from the drop-down list underneath the
text box. Click the Add button to add this object
to the system.
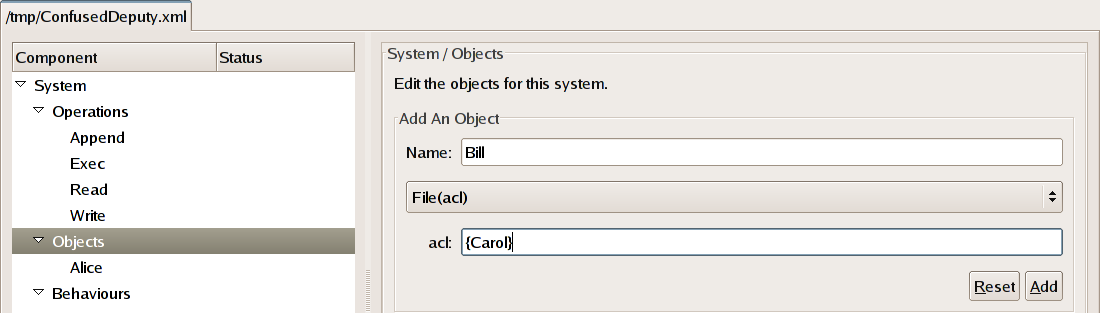
To instantiate Bill repeat the process as above. Once
the corresponding behaviour,
File(acl), has been
selected from the drop-down list a text box will appear underneath
allowing you to specify the value for Bill's
acl. Enter the value
{Carol} and click the Add button to
add Bill to the system.
Repeat the steps above to add Carol to the system. When
defining her behaviour, select
Compiler(acl,logFile)
from the drop-down list
and enter the appropriate values, {Alice} and
Bill, for the parameters, acl and logFile,
respectively.
Having modelled the system, we can now use Authodox to explore and examine its behaviour in order to improve our intuitions about it. Authodox allows you to explore the behaviour of the entire system as well as the behaviour of each individual object.
Warning
Beware that each object's behaviour may differ between when it is explored on its own, and when it is examined as part of the entire system. This is because the behaviour of the other objects in the system can often constrain a particular object's behaviour.Let's begin by exploring the behaviour of Bill. Expand the Objects row of the tree if you haven't already done so and click on the row labelled Bill. This brings up a pane allowing you to edit Bill's properties, including his behaviour. Click on the Explore button. This will open a new window allowing you to explore Bill's behaviour.
Behaviours are explored in terms of the finite-state machines that represent them. The newly opened window allows you to explore the FSM that represents Bill's behaviour. The tree view on the left allows you to expand the state-space of the FSM. Toggling the check button labelled Render Graph displays the FSM in terms of a directed graph whose nodes are the states of the FSM and whose edges are its transitions. The part of the FSM that corresponds to the currently highlighted row of the tree is automatically highlighted in the graph. Exploring an object's FSM allows you to ensure that it behaves as you would expect it to, by enabling you to step through its potential behaviours.
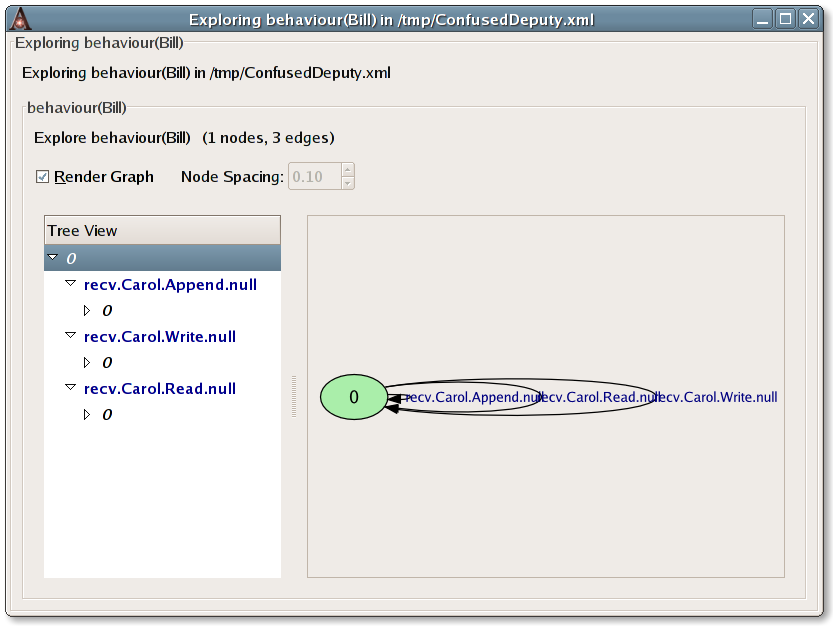
We can see here that Bill's behaviour is a single-state FSM that can
perform any of three events, recv.Carol.Append.null,
recv.Carol.Read.null and recv.Carol.Write.null
which will cause a transition back to its initial state.
This makes sense, given that Bill is a file that should allow
reading, writing and appending only by Carol. Hence, we can see that
Bill's behaviour is accurately captured in our model of the confused
deputy scenario.
The behaviour of the other objects in the system can be examined similarly.
The behaviour of the entire system can be explored by clicking on the Explore System toolbar button. This brings up a similar window allowing you to explore the evolution of the entire system in terms of the FSM that characterises it.
The events of this FSM are either the special event
_tau or they are of the form
ioe_.o1.o2.op.arg and
represent the occurrence of the operation
op on
object o2
by object o1, with
argument arg.
The FSM for the entire system is very complicated. In particular,
it contains a very large number of nodes and most of the edges are
labelled with the special event _tau. This event represents
a nondeterministic choice. These _tau events exist because
of the high level of nondeterminism present in the definition of
Alice's behaviour, User. Later, we will see how to
simplify the system
by refining the User behaviour to something
more deterministic.
Having modelled our scenario, we are now in a position to use Authodox to detect Alice's excess authority.
In order to do so, we must first specify the authority that Alice is allowed to have. She has excess authority, if her actual authority exceeds that which she is allowed to have.
Alice's allowed authority is defined by selecting the Alice row from the tree view and then filling in the text boxes underneath the words "Edit Alice's Allowed Authority". For this example, we are not interested in negative causation (where the occurrence of events causes another to not occur) so we can leave the check box labelled Include Negative Causation unchecked. The distinction between strong and weak causation is not relevant to this example. (The presence of strong causation implies the presence of weak causation.) If Alice can weakly cause Bill to be overwritten then we still consider her to have excess authority. Hence, for now, we can ignore strong causation and leave the Include Strong Causation check box unchecked.
We must first consider the permissions that Alice is allowed to
acquire. She already has permission to invoke Carol, so this must be
included. However, Alice shouldn't be allowed to acquire any further
permissions. Alice's acquirable permissions should therefore be limited to
the ability to Exec Carol.
Permissions are expressed in terms of
send events that represent them. For example, the permission
to Read from Bill would be represented by the event
send.Bill.Read.null. Hence, we can define Alice's
acquirable permissions simply as the set of events
{|send.Carol.Exec|}.
Note
This definition makes use of the extended set notation of CSP. The expression{|a|} evaluates to
the set of events whose first component is a. For example,
the expression {|send.Carol.Exec|} above evaluates to
the set of events
{ send.Carol.Exec.arg | arg <- {Alice,Bill,Carol,null} }.
Enter the expression above into the text box labelled Acquirable Permissions: to define the permissions that Alice is allowed to acquire.
Alice's acquirable authority in terms of positive causation
(in which the occurrence of events causes another to occur) is defined
as the set of events that Alice is allowed to cause to occur. Usually,
we would expect that the invoker of Carol would be allowed to cause the
file that they specify in the invocation to be written to. However, in our
scenario, Alice doesn't have permission to Write to any files.
Hence,
she shouldn't really be allowed to cause Carol to do so on her behalf.
She should be allowed to cause Carol to Append to
Bill, since this occurs naturally as part of Carol's normal operation.
Causation authority is expressed in terms of events of the form
ioe_.o1.o2.op.arg and
represent the ability to cause object o1
to perform operation op
on object o2, with
argument arg.
By definition, an object cannot cause its own events to occur. Hence,
when defining the allowed authority of Alice, we should be careful to
exclude all events that have either o1 or o2 as
Alice.
We may define the set of events that Alice is allowed to (weakly)
cause to occur simply as {|ioe_.Carol.Bill.Append|}.
Enter this expression into the text box labelled
Weak Positive Causation: and click the
Commit button to define the events
that Alice is allowed to cause to occur.

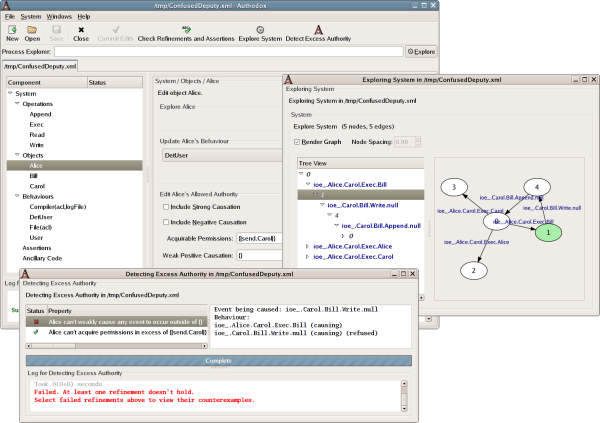
We are now ready to test whether Alice has excess authority. To do so, click the toolbar button labelled Detect Excess Authority.
Doing so brings up a window in which the progress and results of the tests performed to detect excess authority may be examined. In this case, there are two tests. The first tests whether Alice can acquire excess permission. The second tests whether Alice can cause any events to occur that she shouldn't be allowed to cause.
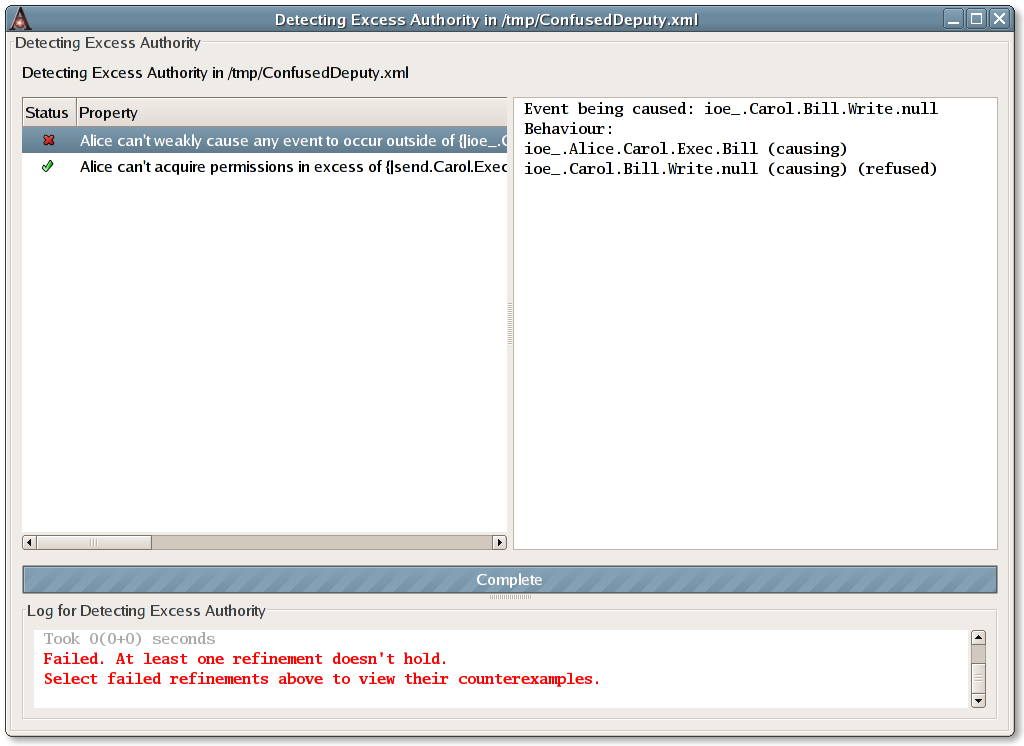
The test for Alice acquiring excess permission passes, meaning that
Alice cannot acquire excess permission. However the test for Alice being
able to cause unwanted events fails, indicating that Alice does indeed
have excess authority. Clicking on the row for this test, labelled
Alice can't weakly cause any event to occur ...
allows us to view a counterexample demonstrating
how Alice can wield her excess authority. In this case, we see that
the occurrence of the event ioe_.Alice.Carol.Exec.Bill causes
the event ioe_.Carol.Bill.Write.null to occur. In other words,
by executing Carol passing the name Bill, Alice can cause
Carol to overwrite Bill.
We see that Alice's excess authority has clearly been detected in this example.
We stated earlier that the FSM for the entire system is very
complicated, due to the high level of nondeterminism present in
Alice's behaviour, User. We will now examine more closely
a particular deterministic subset of the entire system's behaviour.
In particular, we will create a deterministic
refinement of the User behaviour,
DetUser and instantiate Alice to exhibit this new behaviour.
DetUser refines User, meaning that its behaviour
is a subset of the behaviour of User, i.e. any behaviour of
DetUser is also a behaviour of User. By
instantiating Alice with this new behaviour, the entire system will
exhibit a subset of its original behaviour. This subset contains no
nondeterminism and is therefore much more compact. We will examine this
deterministic subset to determine whether Alice's excess authority still
exists here.
Note
Observe that because the new system's behaviour will be a subset of the old, that if Alice has excess authority in the new system then she will also have excess authority in the old system because every behaviour of the new system will be a behaviour of the old system.To create the new behaviour, click on the
Behaviour row of the tree, enter the name of the
new behaviour, DetUser into the text box and click the
Add button.
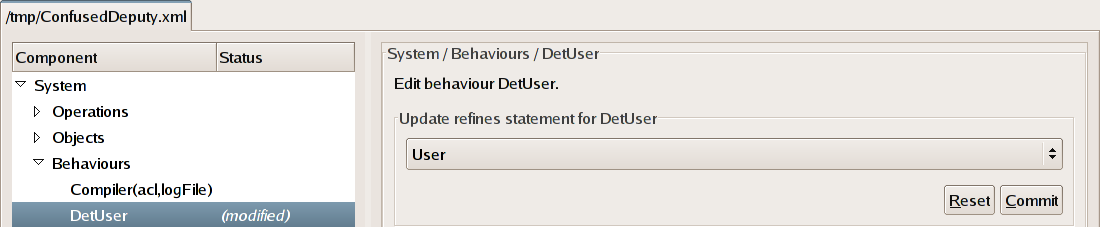
Click on the newly added DetUser row of the
tree. We must specify that the DetUser behaviour refines
the preexisting User behaviour. Select the
old behaviour, User from the drop-down list underneath the
words "Update refines statement for DetUser"
and click the
Commit button.
Now we must define the actual workings of the DetUser
behaviour. This new behaviour is a simple deterministic refinement
of the old.
Enter the following definition into the text box underneath
the words "Update the code for DetUser" and click
the Commit button.
DetUser = send?other?op:{Read,Write,Append}!null -> DetUser []
          send?other!Exec?arg:Object -> DetUser
Notice that it is very similar to the old, except that it
does not have the nondeterministic choice to halt at any point (|~| STOP). This removes all nondeterminism from the original process.
Alter Alice to use the new DetUser behaviour by
selecting the
Alice row of the tree and changing the selection in
the drop-down box underneath the words
"Update Alice's Behaviour" appropriately. Then
click the Commit button.
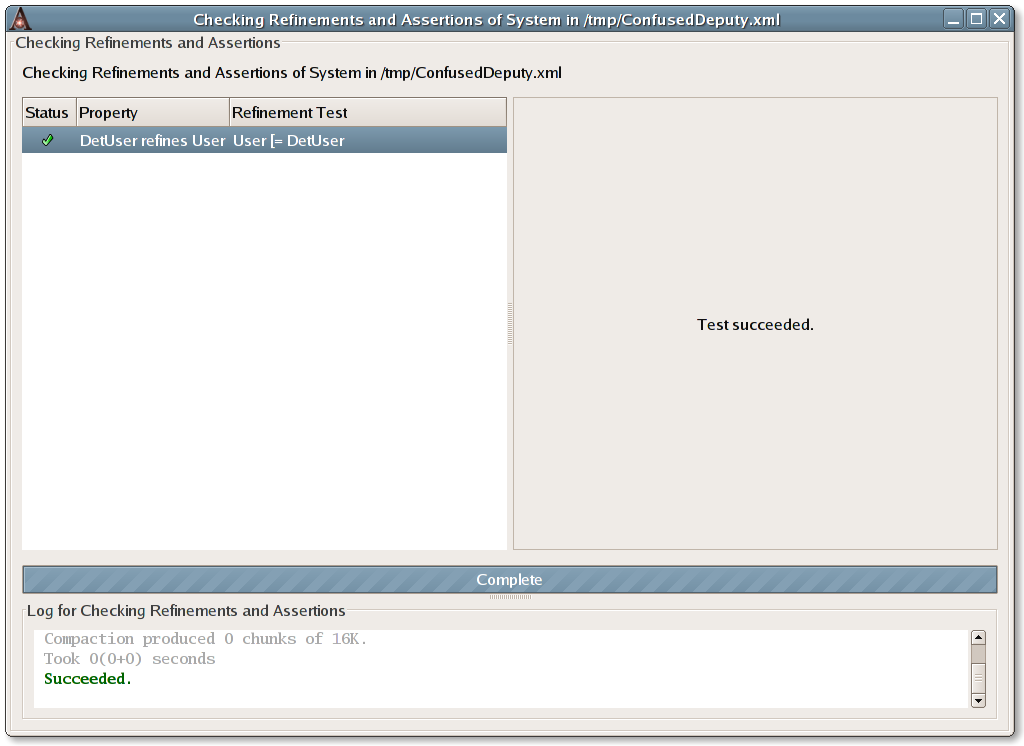
We can have Authodox check that Alice's new behaviour does indeed
refine the old by clicking on the toolbar button labelled
Check Refinements and Assertions. Doing so, should
indicate that the DetUser behaviour does indeed refine the
User behaviour.
Exploring the behaviour of the new system by clicking the Explore System toolbar button shows a much simpler FSM.
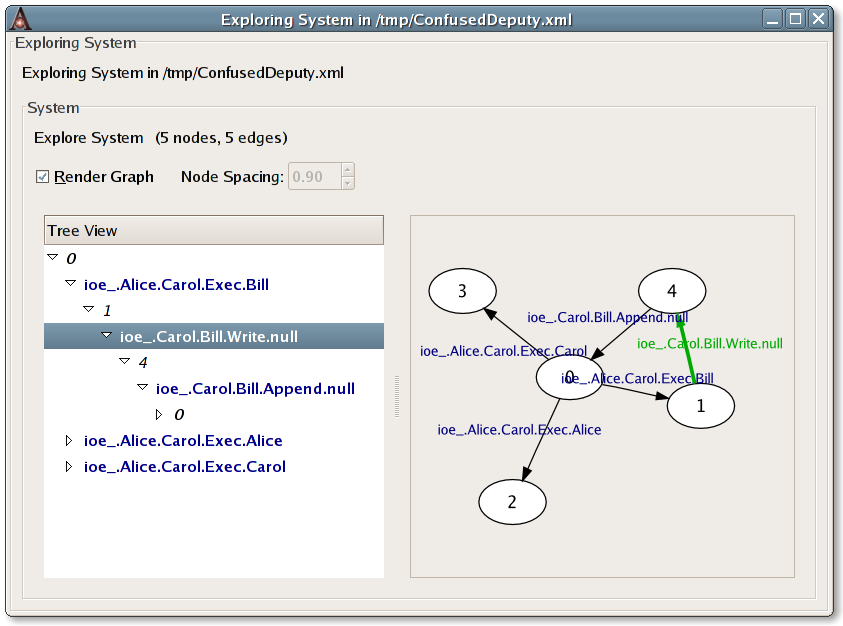
We can be assured that the new system refines the old because the tests performed by clicking the Check Refinements and Assertions button all passed. In particular, this means that if Alice has excess authority in this new system, we can automatically conclude she has excess authority in the old, since every behaviour of the new system is a behaviour of the old.
Note
Of course, we already know that Alice has excess authority in the old system. However, the point is that by refining a complex system we can work with a much simper model. If excess authority exists in the simple model, it will exist in the more complex system. Beware that the reverse is not true. If Alice doesn't have excess authority in the simple system, we cannot conclude that she won't have excess authority in the more complex system.Repeating the checks for excess authority in new simpler system reveals that Alice does indeed still have excess authority.
Here, we discuss the example systems included in Authodox 0.2.0.
All examples are located in directory
${AUTHODOXHOME}/examples/
.
Many of the examples in Authodox 0.2.0 model specific implementations of specific object-capability patterns in various contexts to compare how they operate in each.
These examples were used to generate the results that appear in the paper Analysing Object-Capability Security by Toby Murray, in Proceedings of the Joint Workshop on the Foundations of Computer Security, Automated Reasoning for Security Protocol Analysis and Issues in the Theory of Security (FCS-ARSPA-WITS'08), 2008.
The files for these examples are of the following form:
NAME-TYPE.xml, where NAME is the
name of the pattern and TYPE
is the type of system in which the pattern has been modelled.
TYPE is either
singlethread or multithread and
indicates that the pattern has been modelled in the context of a
single-threaded synchronous object-capability language, like Caja,
or a concurrent object-capability operating system with synchronous
IPC, like seL4, respectively.
The Revocation/ directory contains examples
that model capability patterns relating to revocation. The following
patterns are modelled here:
Membrane- the Membrane patternReturn- the RevocableMembrane pattern
The SealerUnsealer/ directory contains
examples that model small instances of a particular implementation of
the Sealer-Unsealer pattern. The implementation here was first
developed by Marc Stiegler in the context of the object-capability
programming language
E.
The ConfusedDeputy/ directory contains
the Confused Deputy scenario considered in the section called “A Tutorial Introduction to Authodox”.
| ID | Description |
|---|---|
| 2 | Trying to explore the expression "P = STOP" causes the application to hang indefinitely. Similarly, supplying values for things like allowed authority components that result in syntax errors when composed into expressions for FDR also cause the same problem. |
| 4 |
Closing the main dox window while subwindows are still running causes the entire application to crash, requiring the process to be killed in order to exit it. User should be warned if subwindows are still running, when closing the main dox window. |
| 10 |
FDR apparently non-deterministically outputs A fix has been committed for the symptoms of this bug that have been observed so far in revision 716. It will be monitored for any future recurrences in which dox complains of FDR failing for no apparent reason. |
| 11 |
Indicating that Untrusted(caps, n) refines
Untrusted(caps, n+1) causes dox to head into an
infinite loop when it comes time to generate the concrete refinement
assertions if an object has instantiated this abstract behaviour.
There seems no simple way around this problem but it would be nice
to be able to detect this phenomena at runtime.
|
| ID | Description |
|---|---|
| 5 |
The current RCDNTCp predicate is too strong. It should be changed to.
        DNFCp(A,B)(P) = \not \exists u, s, a \in A, e \in B . u ^ s ^ <a> ^ <e> \in traces(P) \land
                                                     (u ^ (s \ A), {e}) \in failures(P).
(see personal notes.)
NoteDirect causation is currently ignored by Authodox so this bug will only become relevant once we turn direct causation back on. |
| 14 |
Change GTK code that currently uses
container.remove(widget)
container.add(widget2)
to change the contents of
container from widget to
widget2. Instead add both to the container initially, then
use
widget.hide()
widget2.show()
to switch from one to the other.
For example, see the following code:
#!/usr/bin/env python

import gtk

win = gtk.Window()
btn1 = gtk.Button("Button 1")
btn2 = gtk.Button("Button 2")

vbox = gtk.VBox()

win.add(vbox)
vbox.pack_start(btn1)
vbox.pack_start(btn2)

def clicked1(*args):
    print  "clicked1"
    btn1.hide()
    btn2.show()

def clicked2(*args):
    print  "clicked2"
    btn2.hide()
    btn1.show()

btn1.connect("clicked",clicked1)
btn2.connect("clicked",clicked2)

win.show_all()
btn2.hide()

gtk.main()
This is crucial since widgets that were in window but are no longer
present because they have been remove()d from their
container, cause problems when that window is destroyed, since the
widgets don't get deestroy()d. Hence, this is really
only a problem for sub-windows of the main dox window in the current
design where the main window lives for the entire lifetime of the
application.
|
- Add Granovetter style diagramming to help users interpret counterexamples and the behaviour of their systems when they're Exploring them.
- Add a "refines" node to the "object/behaviour" node which itself has as its child a "behaviour" node. This will allow us to define a new behaviour for an object that refines the old, but where it still uses the same abstract behaviour as the old. (Might need to enforce that the "name" of the child "behaviour" node is the same as the "name" of the parent (i.e. both instantiate the same abstract behaviour)
- Use a separate thread to render graph images. Currently doing graph rendering blocks the entire dox UI. Graph rendering is really only feasible for small graphs anyway, so we may want to limit it to reasonable sized graphs which might alleviate some of the need to render in separate thread.
-
See whether we can build the actual ISM lazily from FDR's textual
description of it. This might help the overall cost of exploration.
One approach would be:
        - split the transitions list into a list of triples
        - sort the list of triples by source state
        - consult this sorted list when we need the list of edges from a node
This would probably require building a GraphAdaptor which has as its internal state the sorted list of triples. - Consider adding a system-level option along the lines of "analyse permissions only" which in turn prevents the use of causation predicates and has FDR perform all checks in the traces model.
Authodox was written by Toby Murray
(<toby.murray@comlab.ox.ac.uk>).
To report a bug or make a suggestion regarding this application or this manual, contact the author.
A. Authodox Reference
Authodox uses the machine-readable dialect of CSP, CSPM. The best reference for CSPM is perhaps Appendix B of The Theory and Practice of Concurrency by Bill Roscoe.
The following names are automatically defined by Authodox. They can be used, if necessary, as part of CSP code such as behaviour definitions, or expressions involving assertions, allowed authority or anywhere else that CSP syntax is used.
Operation- the set of operationsObject- the set of objectsData* - the set of data values,{null}Params* - the set of parameter values,union(Data,Object)send- the channel over which an object sends messages to anotherrecv- the channel over which an object receives messagesalphabet- a function that gives the alphabet of each objecttheAlphabet- the total set of events for the systembehaviour- a function that gives the process representing the behaviour of each objectSystem- the process representing the systemioe_- the channel over which inter-object events occur in the systemnull- a parameter value
* indicates that this name is only defined when the global system property Operations are Parameterised has been set.
An event
send.target.op.arg
represents the invocation of the object
target
to perform the operation
op,
passing the argument arg.
arg is either an object
name or is the value null. In systems that have no
parameterised operations, the
arg part is omitted.
This event should be used within the code for a behaviour to specify that the object is willing to invoke another.
An event
recv.from.op.arg
represents the reception of an invocation from the object
from
to perform the operation
op,
with the argument arg.
Again,
arg is either an object
name or is the value null. In systems that have no
parameterised operations, the
arg part is omitted.
This event should be used within the code for a behaviour to specify that the object is willing to receive an invocation from another.
An event
ioe_.o1.o2.op.arg
represents the occurrence of the operation
op on
object o2
by object o1, with
argument arg.
Generally speaking, this event should not be
used within the code
for object behaviours since the send and recv
events enable object behaviours to be described more easily. Instead,
it should be used to specify the events
that an object is allowed to cause to occur, or in other contexts besides
the code for an object behaviour.
An event
ioe_.o1.o2.op.arg
can occur only when both
o1 is willing to
perform send.o1.op.arg and
o2 is willing to
perform recv.o1.op.arg.
B. ChangeLog
- Example systems for the analysis of some object-capability patterns added, which were used to produce the results in Analysing Object-Capability Security by Toby Murray, in Proceedings of the Joint Workshop on the Foundations of Computer Security, Automated Reasoning for Security Protocol Analysis and Issues in the Theory of Security (FCS-ARSPA-WITS'08), 2008.
- A structured UI is now used to specify the refines relationships for behaviours rather than a plain text field. This allows more natural refinements to be expressed.
- The system / process on which predicates are applied can now be specified explicitly.
- Format of XML representation of systems altered to include an
explicit version number. Systems created with Authodox version 0.1 are
not compatiable with later versions. In particular,
the old
invokechannel has also been renamed tosendwhich is more suggestive of its purpose. - The process of compiling and importing the ISM of a process to be explored is now logged and a rudimentry progress report supplied to the user.
- Bug fixes and minor enhancements.